Intraosseous Infusion - Femoral: Difference between revisions
From Protocopedia
Created page with "==Procedure Guidelines== ===9.14 INTRAOSSEOUS INFUSION=== The SCEMS Medical Director has approved the Bone Injection Gun (BIG) and EZ IO devices for Intraosseous (IO) access..." |
|||
| Line 41: | Line 41: | ||
* Re-check infusion rate. Fluid challenge 20 cc/kg bolus for hypovolemia. | * Re-check infusion rate. Fluid challenge 20 cc/kg bolus for hypovolemia. | ||
====SAFETY CONCERNS:==== | =====SAFETY CONCERNS:===== | ||
BONE INJECTION GUN | BONE INJECTION GUN | ||
*Do not release the safety until you have the device against the patient and ready for activation. | *Do not release the safety until you have the device against the patient and ready for activation. | ||
| Line 47: | Line 47: | ||
*There are two sharp points on the handle that alert you when the unit is upside down and about to pierce your hand. Watch out! You might not feel them while wearing gloves. | *There are two sharp points on the handle that alert you when the unit is upside down and about to pierce your hand. Watch out! You might not feel them while wearing gloves. | ||
[[File:BIG.jpg|left|400px|]] | [[File:BIG.jpg|left|400px|]] | ||
<br style="clear: both" /> | |||
====PROCEDURE: EZ IO==== | ====PROCEDURE: EZ IO==== | ||
[[File:EZIO_1.jpg|none|200px|]] | |||
* Locate appropriate insertion site (Multiple sites are FDA cleared including - Proximal / Distal Tibia and Proximal Humerus) | * Locate appropriate insertion site (Multiple sites are FDA cleared including - Proximal / Distal Tibia and Proximal Humerus) | ||
[[File:EZIO_2.jpg|none|200px|]] | |||
* Prepare insertion site using aseptic technique. Prepare the EZ-IO® driver and appropriate needle set | * Prepare insertion site using aseptic technique. Prepare the EZ-IO® driver and appropriate needle set | ||
[[File:EZIO_3.jpg|none|200px|]] | |||
* Stabilize site and insert appropriate needle set. Remove EZ-IO® driver from needle set while stabilizing catheter hub | * Stabilize site and insert appropriate needle set. Remove EZ-IO® driver from needle set while stabilizing catheter hub | ||
[[File:EZIO_4.jpg|none|200px|]] | |||
* Remove stylet from catheter, place stylet in shuttle or approved sharps container. Confirm placement. | * Remove stylet from catheter, place stylet in shuttle or approved sharps container. Confirm placement. | ||
[[File:EZIO_5.jpg|none|200px|]] | |||
* Connect primed EZ-Connect®. Slowly administer appropriate dose of Lidocaine 2% (Preservative Free) IO to conscious patients. Syringe bolus (flush) the EZ-IO® catheter with the appropriate amount of normal saline. | * Connect primed EZ-Connect®. Slowly administer appropriate dose of Lidocaine 2% (Preservative Free) IO to conscious patients. Syringe bolus (flush) the EZ-IO® catheter with the appropriate amount of normal saline. | ||
** 20-40mg for adult patients | ** 20-40mg for adult patients | ||
** > 0.5mg / kg for pediatric patients | ** > 0.5mg / kg for pediatric patients | ||
[[File:EZIO_6.jpg|none|200px|]] | |||
* Utilize pressure (syringe bolus, pressure bag or infusion pump) for continuous infusions where applicable. Begin infusion. Dress site, secure tubing and apply wristband as directed. Monitor EZ-IO® site and patient condition – Remove catheter within 24 hours. | * Utilize pressure (syringe bolus, pressure bag or infusion pump) for continuous infusions where applicable. Begin infusion. Dress site, secure tubing and apply wristband as directed. Monitor EZ-IO® site and patient condition – Remove catheter within 24 hours. | ||
Revision as of 21:01, 17 March 2012
Procedure Guidelines
9.14 INTRAOSSEOUS INFUSION
The SCEMS Medical Director has approved the Bone Injection Gun (BIG) and EZ IO devices for Intraosseous (IO) access:
INDICATIONS:
- Immediate vascular access in emergencies.
- Intravenous fluids or medications are urgently needed and a peripheral IV cannot be established in 2 attempts or 90 seconds AND the patient exhibits one or more of the following:
- An altered mental status (GCS of 8 or less)
- Respiratory compromise (SaO2 90% after appropriate oxygen therapy, respiratory rate < 10 or > 40 min)
- Hemodynamic instability (Systolic BP of < 90).
- Cardiac arrest (medical or traumatic)
- Profound hypovolemia with alteration of mental status
- Burns blocking peripheral IV sites
CONTRAINDICATIONS: (If a contraindication is present evaluate the opposite leg for placement.)
- Fracture to the tibia or femur.
- Previous orthopedic procedures. (Example – knee replacement)
- An extremity that is compromised by a pre-existing medical condition. (Example – tumor or peripheral vascular disease)
- Any infection or burn* over the insertion site.
- Excessive tissue at insertion site with the absence of anatomical landmarks (consider alternate site)
- Relative contraindication. If patient has extensive burns, the site can be used if unable to obtain an IV.
PROCEDURE: BONE INJECTION GUN (BIG)
- PEDIATRIC VS ADULT
- Before using the Pediatric B.I.G., select the depth on the adjustable handle according to the appropriate age group:
- 0-3 years old: 0.5 cm
- 3-6 years old: 1.0 cm
- 6-12 years old: 1.5 cm
- The Adult B.I.G. is used for patients 12 years and older and is pre-set to a depth of 2.5 cm. The Adult B.I.G. does not need to be adjusted prior to use.
- Before using the Pediatric B.I.G., select the depth on the adjustable handle according to the appropriate age group:
- Identify an appropriate injection site (1-2 cm. medially and 1 cm. proximally to the tibial tuberosity).
- Prep the site with a providone iodine sponge.
- Position the front of the B.I.G. at the selected site, holding firmly on the rear part to keep it flush with the patient’s tibia.
- Pull out the safety latch by squeezing the two sides together. Note the different sized openings on the safety latch if you need to re-insert the latch in a misfire or cancelled procedure. Do not discard the safety latch as it is used to stabilize the needle after insertion.
- Trigger the B.I.G. by squeezing the rear part toward the two handles. Remember to maintain a firm downward pressure to keep the B.I.G. in close contact with the tibia.
- Remove the B.I.G. and separate the trocar needle from the housing. Pull out the stylet trocar to leave only the needle cannula in the bone.
- Connect a syringe to the needle, aspirate 2-5 cc. of bone marrow to further open access to the vascular system and then connect the infusion solution.
- For conscious patients, consider procedural sedation. PRACTICE PARAMETER 2.04
- Use the safety latch and tape to stabilize the needle.
- Re-check infusion rate. Fluid challenge 20 cc/kg bolus for hypovolemia.
SAFETY CONCERNS:
BONE INJECTION GUN
- Do not release the safety until you have the device against the patient and ready for activation.
- The BIG has two large arrows that point towards the patient to ensure that you do not invert the device and pierce your hand.
- There are two sharp points on the handle that alert you when the unit is upside down and about to pierce your hand. Watch out! You might not feel them while wearing gloves.

PROCEDURE: EZ IO
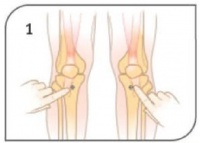
- Locate appropriate insertion site (Multiple sites are FDA cleared including - Proximal / Distal Tibia and Proximal Humerus)
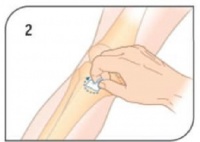
- Prepare insertion site using aseptic technique. Prepare the EZ-IO® driver and appropriate needle set
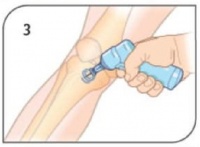
- Stabilize site and insert appropriate needle set. Remove EZ-IO® driver from needle set while stabilizing catheter hub
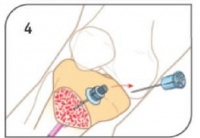
- Remove stylet from catheter, place stylet in shuttle or approved sharps container. Confirm placement.
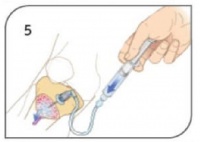
- Connect primed EZ-Connect®. Slowly administer appropriate dose of Lidocaine 2% (Preservative Free) IO to conscious patients. Syringe bolus (flush) the EZ-IO® catheter with the appropriate amount of normal saline.
- 20-40mg for adult patients
- > 0.5mg / kg for pediatric patients
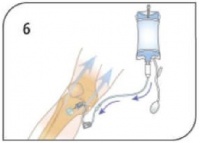
- Utilize pressure (syringe bolus, pressure bag or infusion pump) for continuous infusions where applicable. Begin infusion. Dress site, secure tubing and apply wristband as directed. Monitor EZ-IO® site and patient condition – Remove catheter within 24 hours.
